How To Increase The Lifespan Of Your Decking

A decking installation in Fulham

One of the primary concerns relating to the installation of a new decking system to any outdoor area relates to the materials downgrading over time resulting in the surface beginning to splinter.

Not only does this look unsightly, a splintered surface will significantly reduce the lifespan of the decking and can also be dangerous.

There can be no doubt that splinters need to be avoided wherever possible and if your decking becomes warped or cracked, there is every chance that it will lead to more splinters over time.

A decking installation in Fulham

A Versatile Decking Solution

The versatility and practicality of any decking system are entirely dependent on the quality and the durability of the materials that are used when constructing the deck, along with the ability to regularly maintain the surface.

Thanks to the iDecking Revolution and the creation of the Duro decking board, a new decking system is available which offers both waterproof and splinter proof qualities. 

Even though its formula is kept as a secret Duro’s main ingredient is Rice Husk; a by-product in the processing of rice. This husk, when blended together with virgin polymers, makes this an incredibly versatile, strong and durable material.

Please Note – The rice husk, which makes up 50% of the Duro, is a complete waste product and would be burnt if it wasnโ€™t used in the manufacture of this material, which causes CO2 and pollutant gases; so using it is a major environmental benefit

Which are the highlights of DURO material?

  • Eco-Friendly – 100% Recyclable
  • Low maintenance
  • Extremely stable and durable
  • Can be treated and/or stained as you like
  • No splinters, barefoot walking is welcome!
  • Weatherproof & Waterproof
  • UV ray resistant
  • Insect and termite-proof
  • B1 Class fire resistant

The Perfect Solution

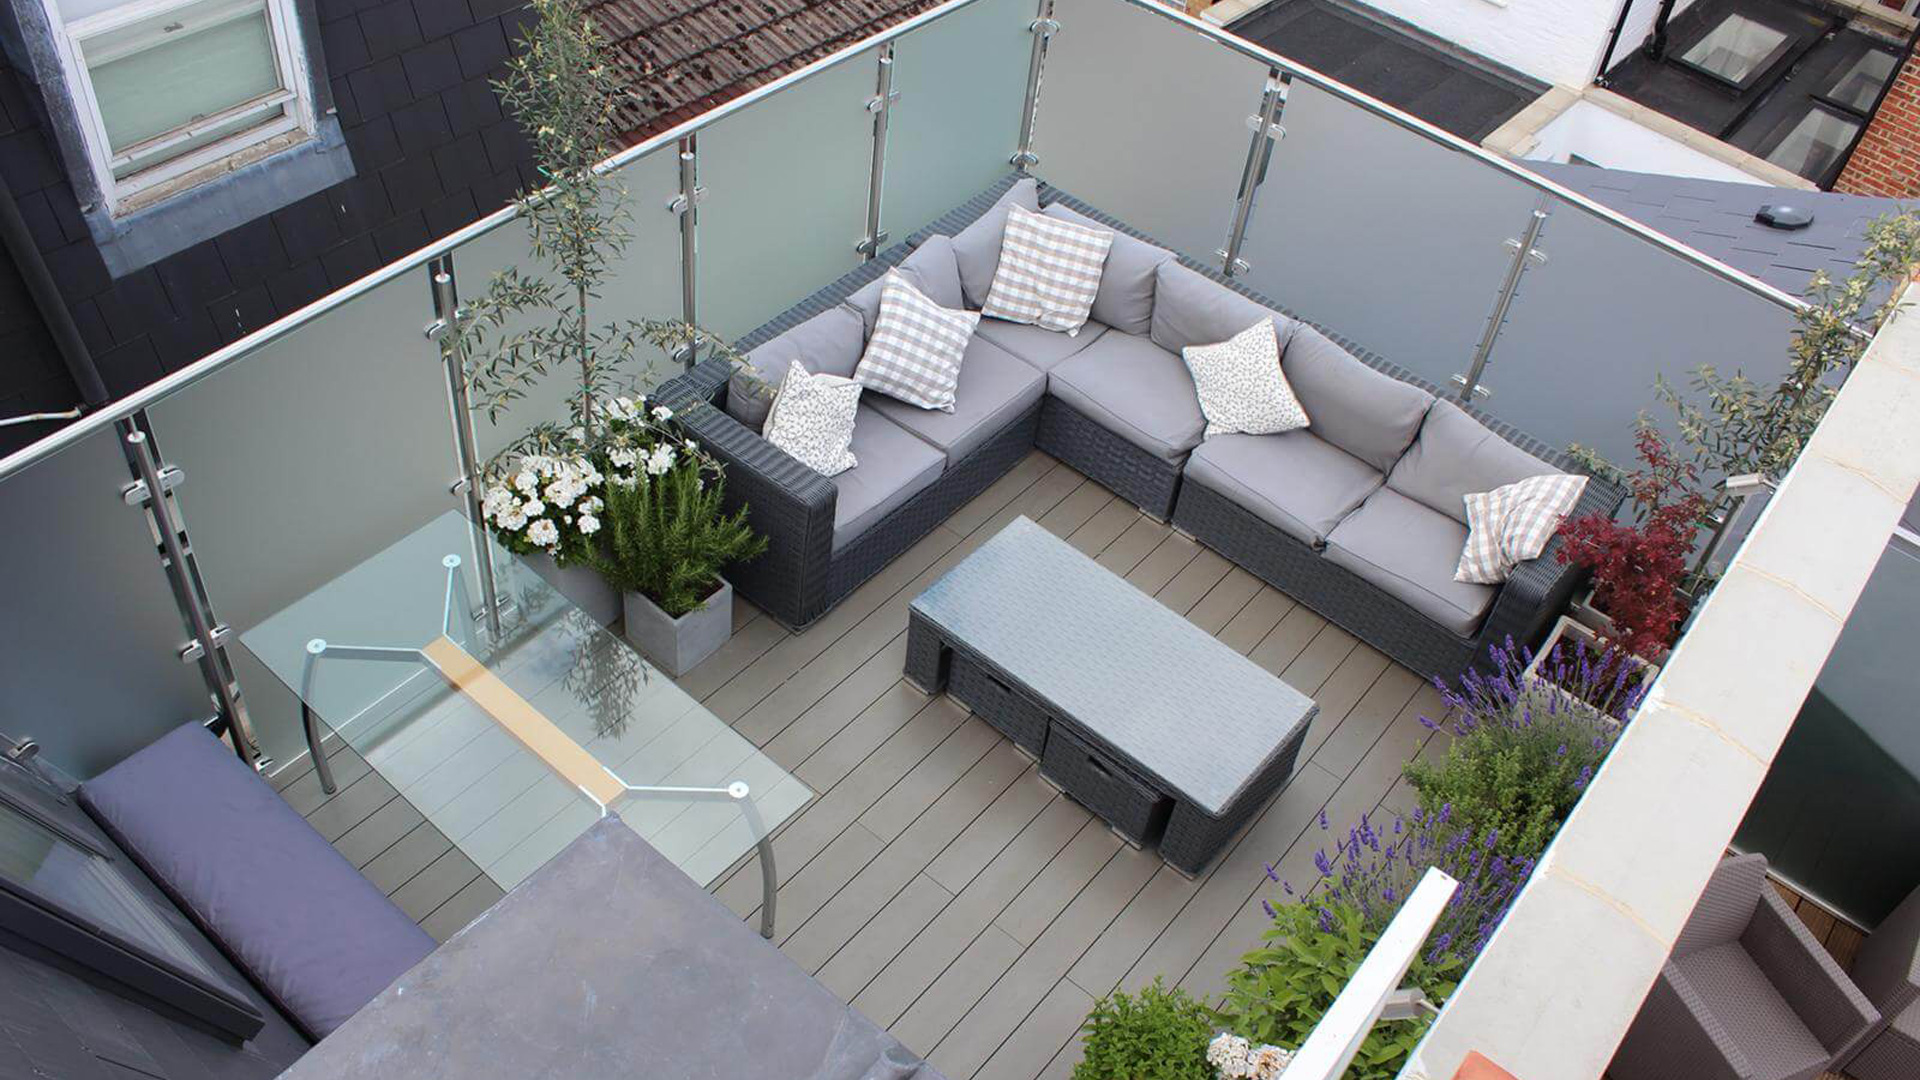
Our DURO Excellence boards provide the most natural-looking composite decking on the market. See our choice of colours here.

The combination of recycled rice husk and virgin PVC provides the most high end, natural finish and ensures boards are hard-wearing and durable in the long term.

The compound is coloured before extrusion, helping to guarantee colour uniformity and grain consistency all the way through each board. This is in contrast to stained boards.

How To Install A Green Roof

Green Roof Installation

This is your step-by-step guide to unpacking, assembling and installing your M-Trayยฎ  modular green roof system from Wallbarn.

Green Roof Installation

Step 1 – Delivery

The M-Traysยฎ are delivered on pallets to the kerbside. It is the buyerโ€™s responsibility to move the pallets from the kerb to the roof/podium.

Step 2 – Unpack immediately

Unpack the M-Traysยฎ from the pallets immediately upon delivery to prevent the sedum plants being crushed. If left stacked for more than 24hrs sedum will start to decompose and die.

Step 3 – Handballing trays

The trays can be easily transported by hand to where they are being laid.

Step 4 – Prepare your roof

Ensure the roof membrane is properly protected and free from dirt and debris. Roll out the supplied geotextile fabric, ensuring an overlap of 20cm. This will act as a protective layer and a filter for drainage. 

Step 5 – Install metal edging

Once the geotextile is laid, install your aluminium edging (optional). This is placed around the perimeter and loosely laid into position. Do not mechanically fix the edging into the waterproofing membrane.

Step 6 – Start placing the trays

The trays are laid over the geotextile fabric and clicked together. They fit over the base of the edging bar.

Step 7 – Tray orientation

Each module has 2 x clips on the Northside and the Eastside; and 2 x recesses on the Southside and the Westside.

Step 8 – Lay irrigation piping

If an irrigation system has been purchased, install as you lay the modules (see irrigation guide) by laying the pipes in between each tray at the base.

Step 9 – Aligning your trays

Repeat the process across the roof taking care to ensure the rows of M-Trayยฎ are properly aligned.

Step 10 – Clipping trays together

Click each module into position ensuring clips are connected over the recess points.

Step 11 – Adapt the trays

For curves, details and end-of-runs, the M-Trayยฎ modules can be easily adapted using a wood saw. Take care not to dislodge the substrate or vegetation too much.

Step 12 – Press open sides together

The open side(s) must always be pressed up to the side of the neighbouring M-Trayยฎ in order to retain the substrate / growing medium.

Step 13 – Create a hard border

Fire Regulations state that M-Traysยฎ must not be installed right up to buildings, walls, roof lights, hatches, mansafes, vents, drainage outlets, or other protruding objects.

Step 14 – Riverstone pebbles

A riverstone pebble border of at least 200mm width should be installed at these points

(See GRO Code for guidance on building green roofs).

Step 15 – Irrigate once installed

After installing the modules, it is essential that you water them thoroughly until fully saturated.

If an irrigation system has not been installed, water by hand.

Step 16 – Fertilize the vegetation

It is recommended that you scatter slow-release fertilizer by hand across the whole roof at the rate of 25 grammes per m2 (a handful).

Green Roof Installation – It Has Never Been Easier

always fill borders with stones on a green roof in Hammersmith

Thanks to the M-TRAYยฎ modular green roofing system, the installation of green roofing systems have never been easier. However, no corners should be cut in the planning stage to ensure that everything runs as smoothly as possible.

The M-Trayยฎ modular green roofing system has been developed and improved to make sedum roofs easier to install.ย The modular system means less disruption to the plants and the structure and has been specifically designed to provide an easy-to-carry tray format which clicks together.

Exactly 4 units per mยฒ make estimating and installing much easier.ย M-Trayยฎ modules are extremely easy to transport and deliver. They can also be used in areas where standard roll-out is not possible.

Modular systems are much more convenient and are faster and future proof compared to roll-out green roof systems.

Green Roofs Birmingham

The Key Advantages of the M-Trayยฎ Modular Green Roofing System

  • Deeper cavities for extra root growth
  • Optimum drainage leading to stronger plant growth
  • More established vegetation at the point of installation
  • More efficient transport and packaging
  • Exactly 4 units per mยฒ
  • Easier to carry trays with smooth handles
  • A closer connection between trays ensures more seamless plant growth
  • No sharp edges ensure reduced risk to the membrane
  • Nothing spills out, less mess
  • Made from recycled plastic with a recycled substrate
  • Less packaging means less waste
  • The UK designed and manufactured

For more on our range of green roofing options, please visit the dedicated section on our website by clicking here.

What Are Inverted Roofs?

An inverted roof

Offering a wide variety of benefits, inverted waterproofing systems are an alternative to the warm roof method.

Benefits of inverted roofs include

  • The waterproofing layer is protected
  • The functional life can be considered to be significantly longer
  • Improved environmental performance
  • Thermal shocks are among the most important factors involved in ageing and fatigue for waterproofing membranes which are not the case for inverted roofs.
  • Better stormwater management
  • Flat roofs can be constructed to offer full and easy access for any future work
  • They can withstand surface traffic
  • They remain unaffected by freeze/thaw cycles

Typically defined as a type of roof which has the waterproofing layer beneath the insulation rather than above it, inverted roofs require the insulation to be ballasted to prevent wind uplift or floating in rainfall water.

Commonly Known As An Upside-Down Roof

Often referred to as an โ€œupside-downโ€ roof, the requirement for increased thickness of the installation board means designers need to be sure that sufficient weight is placed on the boards to prevent movement.

Concrete paving slabs offer a good ballasting solution. To prevent damage to the rigid installation board, the slabs should be suspended onto pedestals.

Wallbarn’s range of pedestals will separate the slab from the deck, create an air gap beneath the slab for effective roof drainage underneath and between the slab and the positioning lugs create uniform straight paving lines drainage.

Offering The Ideal Solution

Offering a durable, cost-effective range of products, our pedestals offer the ideal solution for anyone looking to create a suspended system for their inverted roof which allows easy access to the concealed surface beneath.

More roof and balcony designs incorporate a completely flat upper surface in order to utilise them more effectively as leisure areas. More attractive paving with spirit-level-flat finishes can be achieved using a much larger variety of different stone and slab shapes using our universal supports.

Wallbarnโ€™s range of universal support pedestals/pads ensures that even where contractors build their roofs to a fall to allow good drainage, a completely flat upper level of paving or decking can be achieved.

How Does The Process Work?

Very small, irregular or multiple changes in height can be accommodated using the simple but durable twist mechanism on the stem. Once the slab is placed on top of the support, the whole system locks into place.

Falling roofs can be paved to an even finish extremely quickly and effectively using these supports, cutting down labour time considerably. Edges and end of runs can either be bordered with a line of washed pebbles or by removing the lugs and sliding the support underneath the slab and out of view. Services such as cables or water pipes can be laid underneath the slabs easily, keeping the upper surface uncluttered.

Creating A Suspended Decking Solution

Image of a completed timber decking tiles installation

By using suspended Wallbarn Timber Paving Tiles, installers combine the natural, attractive finish of timber decking with the speed and ease of laying paving slabs.

Traditionally laying timber decking directly onto these deck surfaces led to additional costs of employing specialist carpenters. Laying timber joists directly onto the waterproofing membrane also risked damage over time. Wallbarn Timber Paving Tiles offer the ideal solution. The weight of the tile will hold the system in place.

The Benefits of a Suspended System

This suspended system avoids having to fix anything onto the deck and lifts all the timber away from any standing water, avoiding the dangers of a slippery surface.

As everything is free-standing, the tiles can be taken up and replaced without disrupting the whole area, should the deck need to be inspected. Unsightly items such as drainage outlets, cables and pipes can be hidden beneath the tiles and accessed easily.

Creating a Stunning Finish

Stunning finishes can be achieved. The tiles can be laid in a straight line pattern or in a โ€œchessboardโ€ style, depending on the clientโ€™s wishes. We have a range of different timber available sourced from South America, chosen for their beauty and durability including Ipe and Cumaru. We can also supply FSCยฎ certified timber as we have FSCยฎ Chain of Custody (please speak to your Wallbarn representative).

For more on our range of hardwood timber decking tiles, please click here.

Informed Advice Available

Wallbarn can advise and assist on all aspects of scoping, installing and maintaining your decking project.

Just pick up the phone, ask a question using the live chat facility on this site or send us an email atย info@wallbarn.comย and weโ€™ll get back to you next working day at the latest.

Currently Browsing: Creating A Suspended Terrace Decking System

Addressing The Issues of Working With Very Tight Height Thresholds

pave pad with a slab

The use of Adjustable Support Pedestals to assist the installation of decking or paving can be crucial to help create a space beneath the paved/tiled surface.

Designed to help aid the installation and ensure that rainwater is able to run between and under the slabs rather than pool on top, these pedestals will help to ensure that the surface is less slippery and can even help to prolong the lifespan of decking by reducing the chances of warping due to prolonged exposure to water.

Working With Tight Height Thresholds

When faced with tight height thresholds during the installation, standard ASPs can prove to be difficult to work with due to the limited space available.

Because of this, working with feedback from our customers who needed an effective solution to restricted space areas which still required minor height alterations to achieve completely flat surfaces, Wallbarn developed the MiniPad.

The Smallest Adjustable Pedestal in the UK

We believe that the 10-20mm universal pedestal the smallest fully adjustable pedestal on the market in the UK allowing for use with ultra-low thresholds.

Allowing installers to achieve millimetre precision with our pedestals, the MiniPad decking and paving pedestal can cope with falls in more than one direction and accommodate large drops and channels.ย ย 

Height range 10mm up to 380mm

  • Designed for use when working with very tight spaces
  • The thread allows 5mm of change to the level
  • Further 5mm extension plate which is fitted to the bottom of the pedestal
  • 5mm extension plate turns 10-15mm pedestal into a 15-20mm fully adjustable pedestal for use in tight spaces
  • Special handle grips allow installers to adjust the height whilst slab is in situ – saves constantly lifting the slab to change the height

Special handle grips have been incorporated into the design to help installers fit their fingers into this tight gap and can turn the pedestal to adjust the height. An adjustment can be made whilst the slab is in place, so delays by constantly lifting the slab to change the height are avoided.

The extended handle at the side allows installers easier access for any final movements.

To View Our Universal Range of Pedestals Click Here

Technical Data

By adding two alternative heights: Minipad 22-30mm and Minipad 28-37mm available for slightly higher clearances, to our range, we are able to cover from 10mm to 37mm in just three products.

Using these pedestals, rather than fixed height paving pads, avoids the need to have to spend a large amount of time and effort placing shims under fixed height supports trying to gain the optimum level.

Fully Adjustable

  • Achieve millimetre precision with our pedestals
  • Cope with falls in more than one direction and accommodate large drops and channels
  • Height ranges as follows:
      • Standard Universal range: 35mm up to 365mm
      • Universal Extra: 85mm up to 380mm
      • Minipads: available 10mm up to 40mm
  • Our time-saving alternative to fixed height pads
  • Perfect for overlaying and retro-fitting
  • Achieve precise, split-millimetre accuracy in the height of the pedestal to accommodate tiny changes in the level
CODE HEIGHT DIAMETER OF HEAD DIAMETER OF BASE DISTANCE BETWEEN LUGS LUG HEIGHT WEIGHT TOLERANCE* MAXIMUM LOAD*
SP-MEG-010 10-20mm 150mm 150mm 60mm 15mm 683kg 1,171kg
SP-MEG-022 22-30mm 150mm 150mm 60mm 15mm 683kg 1,171kg
SP-MEG-028 28-37mm 150mm 150mm 60mm 15mm 683kg 1,171kg

Adjustments Made Easy!

In tiny spaces, it can be difficult to make adjustments by hand. This is where the multi-function key called the Easykey can be used.

The curved and shaped profile at one end which can be used as a spanner/wrench type tool. It grips around the series of vertical bars between the head and base and can be used to turn the thread up and down.

The Wallbarn Adjustable Pedestal Range

As well as the MiniPads, we also stock a comprehensive range of adjustable decking and paving support pedestals offering a variety of benefits to your customers.

  • Achieve stunning finishes
  • Suspended system
  • Fully adjustable
  • Superior qualityย (Please click here for more information)
  • Suitable for paving slabs and timber decking

Green Roof: now is the time

M-Tray - Project - Whitstable_000


Now is the ideal time to install a green roof

And there is no easier way than with our M-Trayยฎ modules

Check out thisย roof extension

M-Trayยฎ green roof

Can we help you with a green roof project?

Our team is ready to answer your questions:

icon1.jpg

020 8916 2222

icon2.jpg

icon3.jpg

Online chat


Installing green roofs: some planning tips

Modular Green Roof System Wimbledon


Key planning considerations
for installing a green roof

If you are thinking of installing a green roof, there are a few things you need to think about prior to starting….from budget to maintenance.

Read our guidanceย here

green-roof-install.jpg

Can we help you with a green roof project?

Our team is ready to answer your questions:

icon1.jpg

020 8916 2222

icon2.jpg

icon3.jpg

Online chat


Time for a bit of green roof TLC

default_logo


Green roof maintenance: a quick guide

Our sedum trays need very little maintenance but there is no harm giving your green roof a little care at this time of year.
Green Roof
1. Pull out any weeds that may have got into the sedum.

  • only walk over the sedum if you canโ€™t reach certain areas from the edge
  • sedum squashes down under foot but bounces back in days
  • collect any chips or broken pieces of sedum and scatter them over the green roof, they will re-root into the substrate
Green Roof
2. Remove dead stalks and vegetation from gutters and outlets
Prevent clogging and minimize fire hazards
3. Feed the vegetation with some all-purpose fertiliser 4. Easily plug bare patches
Bare patches can occasionally appear due to foraging wildlife e.g. birds or squirrels. You can fill these in by pulling out small clumps of plants from areas with surplus vegetation and plugging them into the bare soil. These plants will usually take within days.
Green Roof
Green Roof

For more information on maintaining a healthy green roof
click here.

If you need further product, installation or maintenance advice, you can always talk to our knowledgeable team by phone, email or using the live chat facility on our website.

icon1.jpg

020 8916 2222

icon2.jpg

icon3.jpg

Online chat